
21. Load Balancing with lloadd
As covered in the Replication chapter, replication is a fundamental requirement for delivering a resilient enterprise deployment. As such there's a need for an LDAPv3 capable load balancer to spread the load between the various directory instances.
lloadd(8) provides the capability to distribute LDAP v3 requests between a set of running slapd instances. It can run as a standalone daemon lloadd, or as an embedded module running inside of slapd.
21.1. Overview
lloadd(8) was designed to handle LDAP loads. It is protocol-aware and can balance LDAP loads on a per-operation basis rather than on a per-connection basis.
lloadd(8) distributes the load across a set of slapd instances. The client connects to the load balancer instance which forwards the request to one of the servers and returns the response back to the client.
21.2. When to use the OpenLDAP load balancer
In general, the OpenLDAP load balancer spreads the load across configured backend servers. It does not perform so-called intelligent routing. It does not understand semantics behind the operations being performed by the clients.
More considerations:
- Servers are indistinguishable with respect to data contents. The exact same copy of data resides on every server.
- Clients do not require 'sticky' sessions.
- The sequence of operations isn't important. For example, read after update isn't required by the client.
- If your client can handle both connection pooling and load distribution then it's preferable to lloadd.
- Clients that require a consistent session (e.g. do writes), the best practice is to let them set up a direct session to one of the providers. The read-only clients are still free to use lloadd.
- 2.6 release of lloadd will include sticky sessions (coherency).
21.3. Runtime configurations
It deploys in one of two ways:
- Standalone daemon: lloadd
- Loaded into the slapd daemon as a module: lloadd.la
It is recommended to run with the balancer module embedded in slapd because dynamic configuration (cn=config) and the monitor backend are then available.
Sample load balancer scenario:
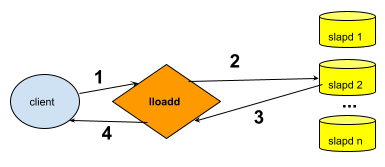
Figure: Load balancer sample scenario
- The LDAP client submits an LDAP operation to the load balancer daemon.
- The load balancer forwards the request to one of the backend instances in its pool of servers.
- The backend slapd server processes the request and returns the response to the load balancer instance.
- The load balancer returns the response to the client. The client's unaware that it's connecting to a load balancer instead of slapd.
21.4. Build Notes
To build the load balancer from source, follow the instructions in the A Quick-Start Guide substituting the following commands:
- To configure as standalone daemon:
-
./configure --enable-balancer=yes
- To configure as embedded module to slapd:
-
./configure --enable-modules --enable-balancer=mod
21.5. Sample Runtime
- To run embedded as lloadd module:
-
slapd [-h URLs] [-f lloadd-config-file] [-u user] [-g group]
- the startup is the same as starting the slapd daemon.
- URLs is for slapd management. The load balancer's listener URLs set in the configuration file or node. (more later)
- To run as standalone daemon:
-
lloadd [-h URLs] [-f lloadd-config-file] [-u user] [-g group]
- Other than a different daemon name, running standalone has the same options as starting slapd .
- -h URLs specify the lloadd's interface directly, there is no management interface.
For a complete list of options, checkout the man page lloadd.8
21.6. Configuring load balancer
21.6.1. Common configuration options
Many of the same configuration options as slapd. For complete list, check the lloadd(5) man page.
-
Edit the slapd.conf or cn=config configuration file.
To configure your working lloadd(8) you need to make the following changes to your configuration file:
- include core.schema (embedded only)
- TLSShareSlapdCTX { on | off }
- Other common TLS slapd options
- Setup argsfile/pidfile
- Setup moduleload path (embedded mode only)
- moduleload lloadd.la
- loglevel, threads, ACL's
- backend lload begin lloadd specific backend configurations
- listen ldap://:PORT Specify listen port for load balancer
- feature proxyauthz Use the proxy authZ control to forward client's identity
- io-threads INT specify the number of threads to use for the connection manager. The default is 1 and this is typically adequate for up to 16 CPU cores
21.6.2. Sample backend config
Sample setup config for load balancer running in front of four slapd instances.
backend lload

# The Load Balancer manages its own sockets, so they have to be separate
# from the ones slapd manages (as specified with the -h "URLS" option at
# startup).
listen ldap://:1389

# Enable authorization tracking
feature proxyauthz

# Specify the number of threads to use for the connection manager.  The default is 1 and this is typically adequate for up to 16 CPU cores.
# The value should be set to a power of 2:
io-threads  2

# If TLS is configured above, use the same context for the Load Balancer
# If using cn=config, this can be set to false and different settings
# can be used for the Load Balancer
TLSShareSlapdCTX true

# Authentication and other options (timeouts) shared between backends.
bindconf bindmethod=simple
         binddn=dc=example,dc=com credentials=secret
         network-timeout=5
         tls_cacert="/usr/local/etc/openldap/ca.crt"
         tls_cert="/usr/local/etc/openldap/host.crt"
         tls_key="/usr/local/etc/openldap/host.pem"


# List the backends we should relay operations to, they all have to be
# practically indistinguishable. Only TLS settings can be specified on
# a per-backend basis.

backend-server uri=ldap://ldaphost01 starttls=critical retry=5000
               max-pending-ops=50 conn-max-pending=10
               numconns=10 bindconns=5
backend-server uri=ldap://ldaphost02 starttls=critical retry=5000
               max-pending-ops=50 conn-max-pending=10
               numconns=10 bindconns=5
backend-server uri=ldap://ldaphost03 starttls=critical retry=5000
               max-pending-ops=50 conn-max-pending=10
               numconns=10 bindconns=5
backend-server uri=ldap://ldaphost04 starttls=critical retry=5000
               max-pending-ops=50 conn-max-pending=10
               numconns=10 bindconns=5

#######################################################################
# Monitor database
#######################################################################
database        monitor